Learning more about Dark and Moody Food Photography and Lightroom Presets

To find his own photography style needs a lot of time. When I began with Food Photography in 2015 I can’t decide which style I love more. The bright or the dark one. I definitely tried out a lot in the last 2 years and I was frustrated so often. But I learned more and … Weiterlesen

Almond vanilla balls and my experiences in food photography

As you know I’m sharing my food photography pictures on Instagram as well as on my blog. Some people ask me why I’m sharing my pictures on Instagram as well. The main reason is to improve my food photography skills. To learn from others and to share my experience and to get experiences back from other food photographer.

Social media is a good place to interchange.

To be honest. Working as a food blogger in your free time means to focus on your favourite tasks. Otherwise you can burn yourself out really fast. Food blogging is such a big field where you can work hours and hours to get more follower and traffic on your page. Everybody need to find his real passion in this niche. Mine is taking pictures. Not getting more and more follower.

I like to share a little bit of my food photography journey as well as my recipe today. I won’t go into the details. This is only an idea how my journey has been.

20161030-almond-vanilla-balls-3-1-von-1

Food photography

Food photography is a big part of my life and I’m always really thankful to find time for it. I’m only taking pictures when I’m sure I have no other obligations during the day to focus myself completely. It’s a kind of creativity and silence for me. Something where I can stop thinking.

Some of you follow me since I started my blog or my Instagram account 1,5 years ago. As you can see in my pictures my results getting better and better. To be honest. I invested a lot of time and patience to learn how to take good pictures. Why? Because I love taking pictures. I love to look at stunning food photography and I love to realize I can do it as well.

Example 1: Turmeric cashew smoothie with lemon

One of my very first pictures was my turmeric cashew smoothie with lemon.

Kurkuma Cashew Smoothie NEU I

As you can see this picture isn’t really clear. Ist blurred.
It is overexposed and the props are really simple. But when I shot it I was so proud of it. Haha.

20161023-cashew-lemon-smoothie-2-1-von-1

I took this shot a few days ago with my new skills. My new lense and I edited it in Lightroom. This picture has a nice  depth of Focus and the probs are so lovely. It isn’t too loud. As you can see it looks much more professional in total. But it takes 1 year to learn how to shot it.

Inspirations

First of all I got a lot of inspirations from other cook book authors, bloggers and Instagramer. I always have a look and think about which kind of food photography I prefer. I read a lot. I bought books to learn how to start. I could tell you in detail how I improve my skills. But it’s so much better to have a book on hand and learn it step by step.

My German recommendations for good books: Food-Fotografie: Leckere Bildrezepte für Einsteiger and  Food-Fotografie – Essen perfekt in Szene setzen (Digital fotografieren)

Natural light & Props

I started using natural light early because I read it everywhere! Natural light is one of the most important things to follow in taking good food pictures. I didn’t use man props like napkins, towels or different cutlery in the beginning. My first pictures were really simple. But I was really proud of every single one because I took it. LOL. Later I discovered my pictures looking better and better when I use some props.

Example 2: A simple smoothie in a small jar

Look at the difference between these two smoothie pictures. I didn’t used probs in the first one. It looks so lonely and not inviting. Sad smoothie.

Kakao Amaranth Smoothie I

In contrast you feel the athmosphere when you look as this simple banana almond smoothie. I try to avoid too many colors but I added some green in the backround and red from the figs to create a nice view. It fits perfect to the wood I used in that picture. Wooden boards are always a good idea.

20160902-banana-almond-smoothie-1-1-von-1

Camera Equipment

I started with a good DSLR camera. Maybe this was the reason I had so much fun when I began. You can easily take pictures with your mobile phone as well but trust me the results with a good camera is so important to improve your skills. And when you decide to take pictures in the future and to invest time to learn it, the camera invest is appropriate.
I use a Nikon DS5200 with a 50mm f/1.8D Lens .

Editing program

In the beginning I used a freeware program to edit my picture. It is from google and the name is picassa. You have the possibility to start editing your pictures without buying an expensive program like Lightroom. You can play around and try out how you can edit your picture to make it looks better. One year later I spend all my money and bought an Apple IMAC with Lightroom. I use it 2 month now and it is the best I ever bought. My results are so much better! I’m also really happy to use Dearnas Food Fotography Guides to learn how to take good pictures and how to edit them in Lightroom.

 tall logo + image

My journey isn’t at the end

I’m sure I can learn so much more about this amazing creative hobby. I’m so happy I discovered my passion of food photography because it’s a place I can turn myself off.
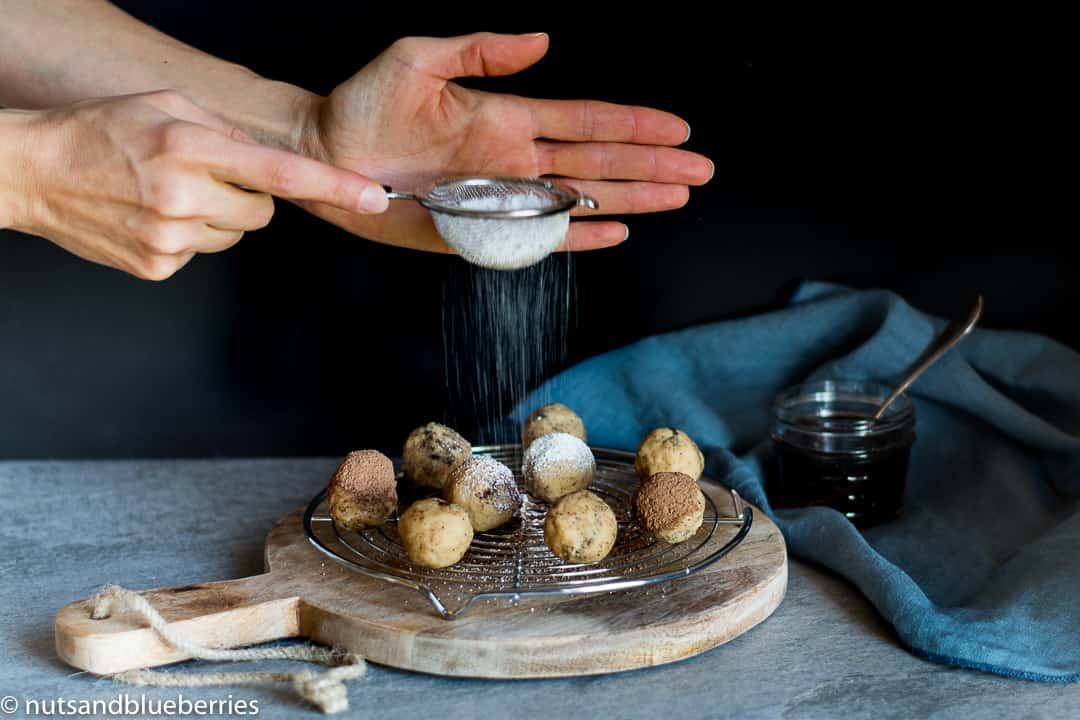
I love to share this recipe today because I’m proud of one of my absolutely first action shots. I watched a guide from Dearnas Food Fotography Guides how to take this kind of pictures. And these balls are really delicious, easy to prepare and healthy. My plan was to make almond butter with peeled almonds. But is don’t works. So I decided to convert the paste into balls.

So let’s go!

20161030-almond-vanilla-balls-2-1-von-1

Almond vanilla balls
 
Author:
Recipe type: Treats
Ingredients
  • 100g almonds (1 cup)
  • 100g desiccated coconut
  • 400g medjool dates (2 cups)
  • 3 tbsp coconut oil
  • 2 tbsp ground vanilla
  • 4 tbsp raw cacao powder
Instructions
  1. Mix up all ingredients (except the cacao powder) in a food processor.
  2. Form the paste into balls.
  3. Sprinkle the balls with cacao powder or icing sugar.
  4. Enjoy!

Follow my blog with Bloglovin


FAVORITES OF THE WEEK

Marta, a mum, is sharing this easy and healthy Little Polenta Bowl with onions

One of my favorite Bloggers, Sara, creates a Basic recipe for overnight oats and chia seeds!

I just discovered this cute shirt, perfect for cat lovers: Cat Lovers – meaningfulpaws 

YOU COULD BE INTERESTED IN THESE POSTS AS WELL

You like to try out a healthy Version of snickers? Here it is: Healthy Hemp Snickers

Everybody loves chocolate! Try out this Nutritious Choclate Mousse

My new disvovery – coconut yoghurt, used in a 2-minutes breakfast bowl


Walnut Oat Cream with baked Banana

Walnut, Cashew Nut, Oats – mix whatever you want! Welcome simply Breakfast Creams! I already published one of my favorite nut creams, my base Cashew Cream. After eating it for a long time I wanted to try another version of a nut or grain cream. So I decided to mix some of my favorite breakfast ingredients and await the result eagerly.

Walnut, Oat and baked Banana!

What a mouthwatering combination. I love to smell the flavor of the baked banana when I fry them in the morning. It’s only a few minutes of work and the result is so amazing. As you already read in one of my previous posts “Dietary Change” it’s one of the best decision to start with changing little things in your life to change your diet. Start with your breakfast! Prepare this walnut oat cream in advance to have a healthy and tasty breakfast for 3 days. You only need to fry the bananas in time because they are not that flavorful when they are cold. Instead of baked bananas you can use any other fresh fruits like apples or simply unbaked banana.

Walnut Oat Porridge with Baked Banana nab (3)

Have you heard about the disadvantages of phytic acids?

Phytic acid has a strong binding affinity to important minerals. Soaking nuts or grains is really healthy because oats contains phytic acids. You need to soak the nuts or grains to break it. For more information read this article: Phytic acid

You can also add a pinch of apple vinegar to make the oats more digestible.

Oats are one of the best breakfast ingredients to make you feel full for longer. They are also one of the grains with the highest protein volume.
And they taste very good and are really versatile. You can soak them, cook them or simply add them cold to your muesli.

Vanilla Almond Butter for everything

By the way: I love to top EVERYTHING with my home-made Vanilla Almond Butter. I always stock a jar of it in my house to have it on hand when I need something sweet. Topping your nut cream or your baked banana with this nut butter brings you to another level of taste! I never know it until I tried it out. You find the simple recipe here: Vanilla Almond Butter

So guys, as promised on Instagram here is the recipes for this walnut oat cream you asked for 😉

Walnut Oat Cream with baked Banana

Serve 4

Cream

100g Walnuts
100g Oats
4-5 Dates
1 Tsp ground vanilla
1 cinnamon stick (or ½ tsp)
200 ml water

To Serve

4 ripe bananas
Coconut oil for frying
Vanilla Almond Butter for topping

Preparation

  1. Soak all ingredients for the cream in 200-300ml water and store in the fridge overnight
  2. Mix the cream in the morning
  3. Fry the banana over medium heat in coconut oil
  4. Serve with baked Banana and Vanilla Almond Butter

Follow my blog with Bloglovin

Walnut Oat Porridge with Baked Banana nab (1)

Healthy Beetroot Sandwich with smoked Tofu

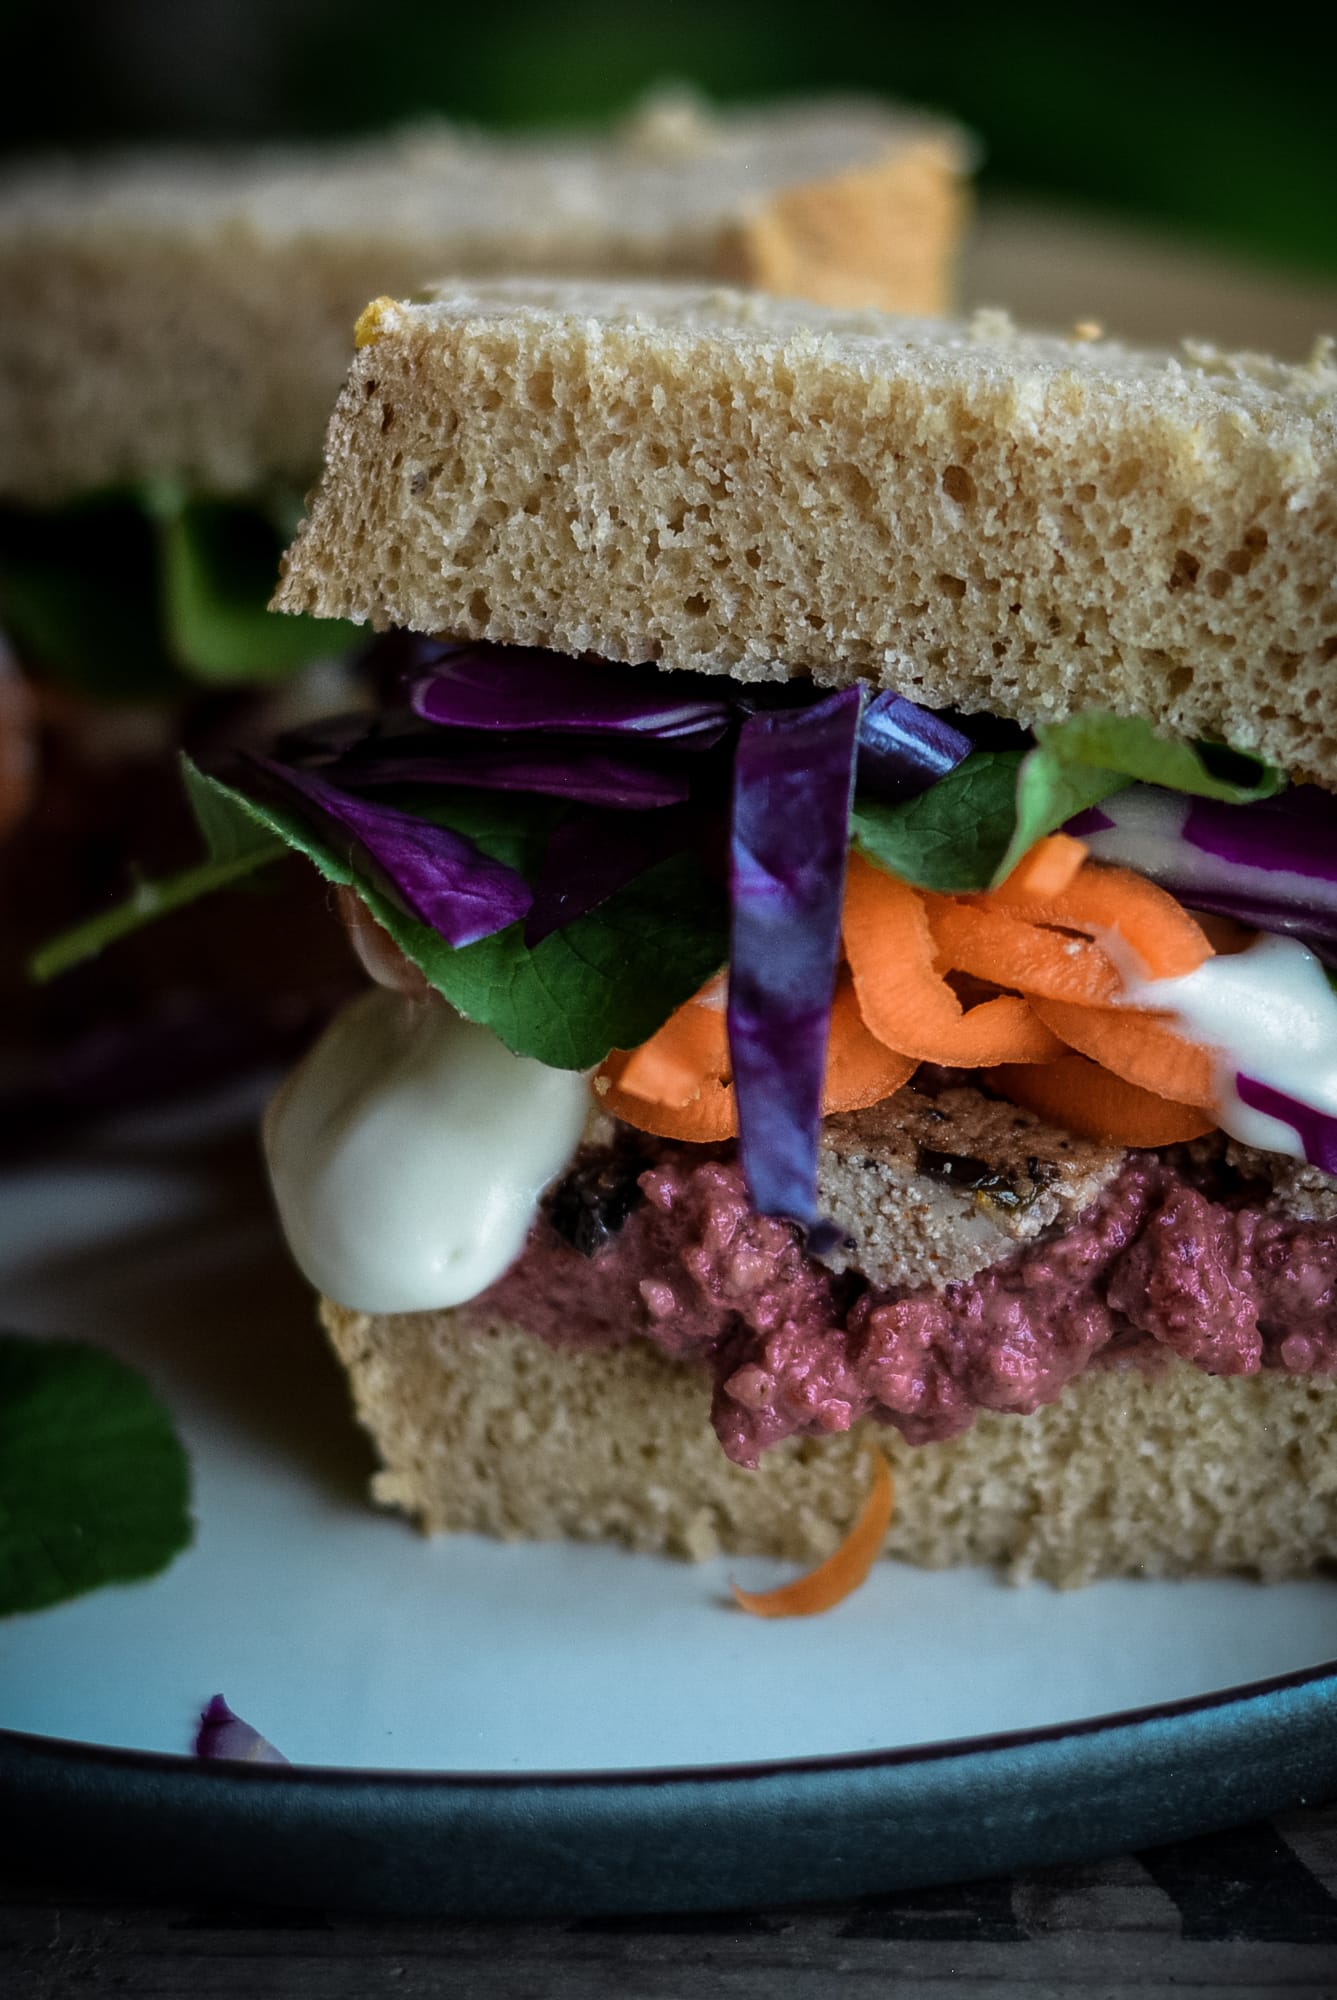
Who don’t love to eat a sandwich? I never made lots of sandwiches in the past because I don’t know how to prepare them. But life is learning right? So I tried out my own Sandwich Version and it worked well as you can see in the picture. Really proud. Haha. I love to combine different colors and ingredients. Soft ones, crunchy ones, warm and cold ones.

Who didn’t get mouthwatering by starring at a sandwich like this? I searched for an alternative for hot summer days. Normally I enjoy salads like this one from my friend Tracy: Broccolie Slaw. But sometimes I need another idea instead of eating salad all day long. Burger are also a classic and nice summer meal idea. For example my Mr. and Mrs. Chickpea Burger.

Tofu on a Sandwich

I love to use Tofu in my kitchen since a few months. I already learned that preparing tofu right isn’t a wonder and its really tasty when you know how to prepare it. You can use the smokes tofu cold or fry it to get a crunchy mode and a warm flavor. Take care of GOOD QUALIFIED TOFU. There is a big difference between the brands.

Vegan or Vegetarian

If you don’t want a vegan Sandwich you can simply switch the vegan mayonnaise in a vegetarian one. Or add some cheese. I was totally overwhelmed about the taste of vegan mayonnaise. Have you ever tried vegan mayonnaise? It don’t taste really different to normal mayonnaise.

This Sandwich is made with a light flavored red beet hummus which is made within seconds. I got this really nice inspiration from my friend Niki (www.rebelrecipes.com). You find the original recipe here: Beet Root Hummus. Because I have a garlic allergy I made my own one without garlic. Beet Root is a natural superfood which your body will love. Beets are full of potassium, magnesium, fiber, phosphorus and iron. Beets are also particularly beneficial to women whom are pregnant, as the vitamin B and iron are very beneficial to new growth cells during pregnancy and replenishing iron in the woman’s body.

Grated carrots and Red Cabbage is such a crisp benefit for this Sandwich. It’s the perfect balance between softness, crunchiness and the smoked flavor from the tofu.
I love to prepare the ingredients for this Sandwich in advance and make it IN TIME when I need it. You can store the ingredients up to 3-4 days in the fridge. Perfect for days you don’t have many time to cook. And you can eat the Sandwich whenever you want. It’s the perfect start in the morning as well as a great lunch or dinner.

Bread

The right Bread is really important for a Sandwich. Therefore I use a wheat whole grain bread which is fluffy and healthy as well. Don’t use a Bread which is too strong. Use one which is light and fluffy. One which have less seeds or nuts.


Healthy Beetroot Sandwich with smoked Tofu
 
Author:
Recipe type: sandwich
Ingredients
  • 2 Slices of soft bread (I use wheat whole grain)
  • 4 Slices smoked tofu
  • 2-3 tbsp vegan mayonnaise
  • 1 carrot, grated
  • red cabbage, grated
  • basilicum
  • Red Beet Hummus
  • 2 red beets (I used cooked ones)
  • 4 tbsp walnuts, raosted
  • 4 tbsp olive oil
  • salt and pepper
  • 2 tbsp tahini
Instructions
  1. Mix up all ingredients to make the red beet hummus. Season with salt and pepper.
  2. Fry the smoked tofu slices over high heat for a few minutes until crispy
  3. Spread one half of the bread with red beet hummus
  4. Add smoked tofu and spread the vegan mayonnaise on top
  5. Final add the grated carrot and red cabbage. Sprinkle with some Basilica leaves if you like
  6. Top with the other half of the bread
  7. Enjoy.
  8. It’s a mess but it really worth it :o).


Follow my blog with Bloglovin

Happy Sandwich mit rote Beete Hummus und geräuchertem Tofu

Wem läuft nicht das Wasser im Mund zusammen, wenn er ein leckeres Sandwich sieht? Für die warmen Sommertage habe ich nach Alternativen zum Salat gesucht und bin auf die Idee gestoßen, ein leckeres bunt belegtes Sandwich zu kreieren. Nach mehreren Versuchen ist dieses gesunde Sandwich mit rote Beete Hummus und geräuchertem Tofu dabei rum gekommen, welches frisch belegt mit dem angebratenen warmen Tofu genauso gut schmeckt wie kalt. Es kann variabel als veganes oder vegetarisches Sandwich zubereitet werden, indem du einfach vegane oder nicht vegane Mayonnaise benutzt. Übrigens gibt es bei uns im Sommer auch unsere Kichererbsenburger sehr häufig, da man sie auch gut am nächsten Tag kalt essen kann.

Vegane Mayonnaise

Vor 3 Wochen habe ich mir zum ersten Mal vegane Mayonnaise gekauft und war überrascht, dass sie genauso schmeckt, wie die vegetarische. Es ist lediglich kein Ei drin, ansonsten sind die Inhaltsstoffe fast identisch. Viel Sonnenblumenöl, Gewürze etc. Nach wie vor esse ich noch Käse, finde vegane Alternativen hin und wieder doch sehr spannend. Man entdeckt so viele neue Lebensmittel und Zubereitungsarten.

Rote Beete Hummus

Belegt wird dieses Sandwich mit einem leckeren Walnuss-Rote-Beete Aufstrich, der in wenigen Sekunden zubereitet ist. Der rote Farbstoff Betanin, der das Wurzelgemüse so wertvoll macht, macht Viren und Bakterien inaktiv und fördert den Abtransport aus deinem Körper. Das ist gut für deine Abwehrkräfte. Weitere enthaltene Inhaltsstoffe, wie Vitamin-B, Folsäure und das Spurenelement Eisen sind bei der Blutbildung involviert. Als leckere gesunde Alternative zu Wurst und Käse ist dieser Aufstrich seit einigen Wochen fester Bestandteil in meiner Küche. Das Rezept zu dem Hummus habe ich von einer Blogger Freundin, Niki. Sie betreibt einen wundervollen veganen Blog und macht sich jetzt sogar selbstständig im Food Business. Ich liebe ihre ausgefallene Küche.

Geraspelte Möhre und Rotkohl verleihen dem Sandwich einen knackigen Biss. Was ich persönlich super finde ist, dass die Zutaten für dieses Sandwich 1-2 Tage im Voraus zubereitet werden können und es täglich neu frisch belegt werden kann. An manchen Tagen nehme ich mir ein Sandwich in die Pause mit und genieße es auf der Sommerwiese, an manchen Tagen bereite ich es mir abends zum Abendessen zu.

Für das Sandwich habe einmal ein Weizenvollkornbrot gekauft und einmal eins aus frisch gemahlenem Weizen gebacken. Ich habe ein schnelles Rezept von Alnatura verwendet: Weizenvollkornbrot. Egal, was du machst, ich empfehle ein fluffiges, nicht zu festes Brot für ein Sandwich.

Räuchertofu

Den Räuchertofu kannst du roh verwenden oder anbraten, damit er schön kross wird und das Räucheraroma noch mehr herauskommt. Seit einigen Monaten erst nutze ich Tofu in diversen Varianten in meiner Küche, da ich vorher einmal schlechte Erfahrungen gemacht habe. Achte bei dem Tofu auf Qualität, nicht jeder Tofu schmeckt gleich. Ich habe nur einige wenige Produkte, die ich immer wieder kaufen kann und mir schmecken. Ich kaufe mir diesen Räuchertofu im Bioladen: Räuchertofu Klassik

Eine Empfehlung noch für einen super leckeren ausgefallenen rohen Brokkoli Salat findet ihr bei Traci: Broccolie Slaw.
Für die nächste Grillparty EIN HIGHLIGTH! Ich verspreche es euch. Tipp: Ich habe ihn ohne Rosinen gemacht.

Happy Sandwich mit rote Beete Hummus und geräuchertem Tofu
 
Author:
Recipe type: sandwich
Ingredients
  • 2 Scheiben frisches weiches Brot (z.B. Weizenvollkornbrot)
  • 4 Scheiben geräucherter Tofu
  • 2-3 EL vegane Mayonnaise
  • 1 Karotte, geraspelt
  • Rotkohl, geraspelt
  • Basilikum
  • Rote Beete Hummus
  • 2 rote Beete (vakuumiert)
  • 4 EL Walnüsse, geröstet
  • 4 EL Olivenöl
  • Salz & Pfeffer
  • 2 EL Tahini (Sesammus)
Instructions
  1. Für den rote Beete Hummus püriere alle Zutaten, bis eine cremige Masse entsteht
  2. Brate den Räuchertofu auf hoher Hitze in etwas Olivenöl kurz von beiden Seiten an
  3. Bestreiche eine Brothälte mit dem Hummus
  4. Belege Sie mit dem gebratenen Räuchertofu
  5. Bestreiche diese mit 2-3 Esslöffel veganer Mayonnaise
  6. Gebe darauf geraspelte Möhre, Rotkohl und 2-3 Basilikumblätter
  7. Schließe das Sandwich mit der anderen Brothälfte
  8. Etwas Sauerei beim Essen, aber es schmeckt köstlich 


Follow my blog with Bloglovin